Maple Almond Fudge

Maple Almond Fudge

Maple Almond FudgeWell as much as I tried I couldn’t hold on to fall very long. Leaves are covering the street and its been nasty cold lately (like 60’s and rainy cold)! Being in Chicago it will only get worse but I was enjoying the nice summer we had. Come Fall I always think of hot beverages (I mostly drink hot water… I know, weird.) I do have a weakness for fudge – the nerd in me wants to call it my kryptonite – but maybe that’s because I just finished binge watching Supergirl on Netflix.

Anyhow, I came across a fudge recipe the other day and just had to make it! This fudge recipe called for coconut oil, cashew butter and honey which sounded amazing but because of my sensitivity to fructose that was not going to happen. Honey is 100% fructose! So, I modified it! I love having an understanding of food and being comfortable changing ingredients because it opens up the world of food! You can make pretty much anything you want 🙂

Well, through my modifications I came up with Maple Almond Fudge – yumm!

Maple Almond Fudge
 
Author:
Ingredients
  • ¼ cup coconut oil
  • 3 tbsp pure maple syrup
  • ½ cup almond butter
Instructions
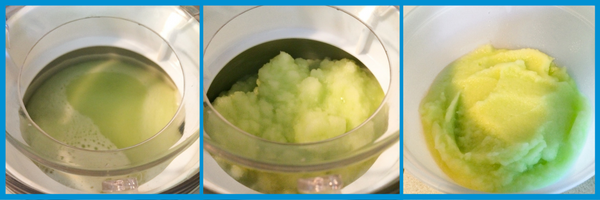
  1. Melt coconut oil on low heat in a small pot.
  2. Add maple syrup and almond butter.
  3. Stir until smooth and all incorporated.
  4. Pour into small pan or individual cups and place in refrigerator to solidify.
Notes
Nutrition information is not provided due alterations that can be made to accommodate food sensitivities.


Alternatives:
Nut butter – any allowed nut butter can be used!
Sweetener – maple syrup, honey, or brown rice syrup can be used to sweeten these babies 🙂

**Coconut oil is an important ingredient – this is what keeps the fudge solid. You can use coconut butter in its place if you have it on hand!


Products:


Did you make any variations? We would love to know what you tried!

Enjoy!

Chicken Fried Rice

Chicken Fried Rice

Chicken Fried RiceThe idea of Chinese food always sounds good. I always think that I love Chinese food until we order it from the typical Chinese carryout restaurant and I realize that I’m not sure what I loved about it… its heavy, salty, MSG-filled, and covered in random mystery sauces. Oh and it makes my IBS flare up!

Soo…Epiphany!

Make your own! I love homemade Chinese food because it is light, filled with veggies, flavorful and totally customizable! Totally opposite of the restaurant version.

My favorite Chinese food is chicken fried rice. For this recipe I used the leftover Chinese restaurant white rice that no one eats because they always buy fried rice… If you are smart enough not to order Chinese food from a restaurant then you can make your own white rice or brown rice and use it in this recipe.

If you eat chicken and rice regularly and keep it around the house you can put this dinner together in a matter of minutes.

Chicken Fried Rice
 
Author:
Cuisine: Chinese
Serves: 4
Ingredients
  • 3C white (or brown) rice
  • 2 tsp sesame oil, divided
  • ¼ C soy sauce
  • ¼ C frozen peas
  • ¼ C frozen corn
  • 1 large carrot, small dice
  • 2 eggs
  • 1 chicken breast, cooked and diced
Instructions
  1. Heat 1 tsp sesame oil in a large pan. When hot, add frozen peas, corn and diced carrots and cook for a few minutes, until soft.
  2. Add cooked rice to the pan and mix with vegetables.
  3. Add diced chicken to the pan and heat ingredients together.
  4. Push the contents of the pan to one side. Pour remaining sesame oil (1 tsp) on empty side of the pan. Scramble eggs and add to pan. Mix eggs while cooking to scramble.
  5. Incorporate scrambled eggs in with the rice mixture until evenly combined.
  6. Pour soy sauce over contents of pan and mix again until evenly combined.
Notes
Nutrition information is not provided due alterations that can be made to accommodate food sensitivities.


Alternatives:
Chicken Fried Rice Protein – Use thin slices of beef or small shrimp in place of chicken

Vegetables – Any vegetables are fair game here! Broccoli bits, chopped onions, zucchini, etc. This is one way you can truly customize your meal!

Soy Sauce – this is an important part of the dish but there are alternatives that you can buy. There are many brands of soy sauce. Kikkoman in particular has gluten-free soy sauce and tamari that has limited ingredients. Bragg Liquid Aminos is an alternative to soy sauce and tamari that is not fermented (better alternative for those that are tyramine sensitive). Bragg Coconut Aminos is another alternative that is soy free and not fermented.


Products:


Do you make fried rice at home? What ingredients do you use?

Enjoy!


Honeydew Sorbet

Honeydew Sorbet

Honeydew SorbetLeaves are changing quickly and every morning it has been getting cooler… I’m so not ready for fall yet! This summer went by so quickly, we didn’t even get to a waterpark!

In a last ditch effort to bring back summer I thought I would make a light, refreshing summer-y dessert 🙂 Ice cream is always a go to during the summer but for those of us who are lactose intolerant, ice cream isn’t always a good idea. Don’t get me wrong, I crave (and eat) ice cream occasionally but its nice to eat dessert without feeling sick or having to run to the bathroom.

My honeydew sorbet is made with 3 ingredients (+ water… does that count?) and can be modified to meet your specific needs.

Honeydew Sorbet
 
Author:
Recipe type: Dessert
Serves: ½ gallon
Ingredients
  • 5 C honeydew, diced and chilled
  • ¾ C cane sugar
  • ¾ C water
  • 1 lemon, juiced
Instructions
  1. Create a simple syrup by heating sugar and water in a sauce pan. Pour the simple syrup in a container and refrigerate to cool. You can freeze to speed up the process - make sure not to freeze the syrup.
  2. Combine the chilled honey dew and simple syrup in a blender, add juice from 1 lemon and blend until smooth.
  3. Pour the contents of the blender into your ice cream maker and follow manufacturer instructions.
  4. Freeze sorbet until solid. Before serving, take sorbet out of the freezer about 5 minutes in advance.
Notes
Nutrition information is not provided due alterations that can be made to accommodate food sensitivities.

Making sorbet

Alternatives:
Fruit – Try using cantaloupe or watermelon to make the same different versions of this sorbet.
Sweetener – you can use honey in place of cane sugar in the same quantity. Be careful if you are sensitive to fructose! Honey is 100% fructose and so is fruit 🙂 You can also try an alternative sweetener (i.e. stevia) for a low calorie version of this refreshing dessert!


Also try our Diary-Free Fudgesicles for another delicious summer dessert!


Products:

Here is another great recipe to make with this product: Roasted Almond Chocolate Ice Cream


Let us know if you tried this with a different fruit!

Enjoy!

Crockpot Quinoa Enchilada

Crockpot Quinoa Enchilada

Crockpot Quinoa EnchiladaA couple of months ago I started part time consulting at a local migrant Head Start program. As their nutritionist, I plot all of the kids on a growth chart to identify where they fall in terms of weight for length (height). For the kids that plotted above the 85th percentile I was able to sit down one on one with the parents of the overweight/obese kids and discuss the importance of exercise and a healthy diet. Majority of these kids are getting multiple sweets per day and limited vegetables. Just a few weeks ago I was able to host a meeting with all of the parents to share my role at the school and answer any questions.

During the meeting we were raffling off a crockpot so I made a healthy twist on the classic mexican dish – enchiladas. The director of the school told me that the kids are given quinoa and really seem to like it. Quinoa cooks very similar to rice but if a complete protein – meaning that it can replace meat in a meal.

Try this recipe with: crusty dutch oven bread!

Crockpot Quinoa Enchilada
 
Author:
Cuisine: Mexican
Ingredients
Crockpot Enchilada
  • 1 cup quinoa, rinsed
  • 1 - 15oz can pinto beans, drained and rinsed
  • 1 - 15oz can corn, drained
  • 2 - 15oz cans diced tomatoes
  • 2 cups enchilada sauce
Enchilada Sauce
  • 3 cups broth
  • ¼ cup tomato paste
  • ¼ cup all purpose flour
  • 2 Tbsp allowed oil
  • 2 tsp cumin
  • ¼ tsp garlic powder
  • ¼ tsp onion powder
  • ¼ tsp paprika
  • Optional: start with ¼ tsp cayenne pepper for spice. Add more to taste.
Instructions
Enchilada Sauce
  1. In a small bowl, mix flour, cumin, garlic powder, onion powder and paprika.
  2. In medium saucepan, heat oil over medium heat.
  3. Add tomato paste and bowl of spice mix.
  4. Cook 1 minute, whisking continuously.
  5. Whisk in broth, increase heat, and bring to a light boil.
  6. Reduce to simmer. Cook about 8 minutes until slightly thickened, whisking occasionally.
  7. Add salt/pepper to taste.
Crockpot Enchilada
  1. Place pinto beans, corn, tomatoes and quinoa in a crockpot. Stir everything together and top with enchilada sauce.
  2. Cover and cook on high for 4-5 hours or on low for 8 hours.
Notes
Nutrition information is not provided due alterations that can be made to accommodate food sensitivities.

Quinoa Enchilada


Products:

Here are other great recipes to make in your crockpot: Crockpot Whole Chicken


Would love to know what you think and if you made any alterations!

Enjoy!

Crusty Dutch Oven Bread

How to Make Crusty Dutch Oven Bread

Crusty Dutch Oven BreadI found this dutch oven bread after several years of trying to perfect the art of making bread. And it truly is an art. The right amount of yeast, salt, flour and time to rise all contribute to flavor and texture of your bread. Some batches were too dense or they didn’t rise enough to look like a fancy artisan bread – more like a flat disc…

Finally, I found this recipe that is fool proof! This crusty dutch oven bread is almost impossible to screw up. It is simple – mix the ingredients together and leave it alone for about half a day. Bake it and its delicious 100% of the time.

The hardest thing about this recipe is just letting the bread sit and doing nothing!

As you could probably guess by the title, this bread is made in a dutch oven. This is the dutch oven that I use, it was a hand me down from Brandon’s mom and I make everything in it now! Bread, soups, stews, etc. Having a heavy bottom cast iron pot is great for all sorts of cooking and would be a great investment if you don’t have one already. In doing a quick google search it looks like they range in price from $25-$300+ if you want the fancy name brand Le Creuset Signature Dutch Oven.

Need something to eat with your bread? Try our 5-ingredient cauliflower soup! I like to make croutons out of my bread to add a nice crunch to this soup.

Crusty Dutch Oven Bread
 
Cook time
Total time
 
Author:
Recipe type: Bread
Serves: 12
Ingredients
  • 6 C all purpose flour
  • 3 tsp salt
  • 1 tsp active dry yeast
  • 3 C water (warm)
Instructions
  1. In a large bowl mix together flour, salt and yeast. Pour water into bowl and mix ingredients together until incorporated. Cover bowl with a clean towel and let sit in a warm place for 15-20 hours.
  2. Preheat oven to 450 degrees. Add dutch oven and lid to the oven during the preheat time. You want the dutch oven heat up as well
  3. Flour your work surface and hands. With floured hands gently remove the bread dough from the bowl. The bread can be very sticky. I find that it helps to sprinkle some flour over the top of the dough, especially around the edges of the bowl so that it drops down the sides as you pick up the dough.
  4. Shape your dough into a ball and drop it into the hot dutch oven. Put the lid back on and place it in the oven.
  5. Bake for 30 minutes with the lid on. Remove the lid and bake for another 15-20 minutes until golden brown.
  6. Remove from the oven and let cool.
Notes
I have a very large (6.5Qt) dutch oven so this recipe makes a lot of bread. If you have a smaller dutch oven you can cut the recipe in half and it still works great!

**Nutrition information is not provided due alterations that can be made to accommodate food sensitivities.


Alternatives:
Flour – I wouldn’t get too crazy with gluten free flour blends unless you have a blend that you use as all-purpose flour. I have not had a chance to experiment with gluten free bread at this time. You can use whole wheat flour for a different flavor profile. This would be used in the same quantity.

Additions: 
If you are feeling fancy, add some spices/herbs to your bread like garlic, basil, oregano, etc!


Products:

Here are other great recipes to make with these products: Cauliflower Soup


Did you add any other flavorings? We would love to know what you tried!

Enjoy!

Shrimp Boil Foil Packets

Shrimp “Boil” Foil Packets

Shrimp Boil Foil PacketsThis morning we woke up to a dark stormy sky to get ready to run the Terrain Race – a 5k or 10k race filled with 20+ obstacles. And today they were especially muddy obstacles! Brandon loves to run these races and is used to getting dirty but I don’t believe I have ever been so dirty in my life. Today was filled with several firsts for me.

First time running a 5k.

First time getting in a pool of water with all of my clothes on.

First time sliding down a mountain of mud into even muddier water.

2016-08-20 14.14.32

Needless to say we were both pretty tired when we got home and the last thing we wanted to do was cook/clean up dinner but eating out was not an option either!

Tonight I decided to make Cajun shrimp foil packets with the corn and red potatoes I bought from a local farm stand and it was delicious. I normally make my own spice mixes but I have to admit that tonight I used a remade cajun spice mix for ease. We don’t make cajun food often so I didn’t have a mix made.

Most of the recipes that I have seen for foil packet dinners call for them to be cooked on a grill – I think they are meant for camping trips. In our case, a grill was not happening for two reasons. A) it was raining and B) we were lazy.

Cajun Seasoning Mix
1T smoked paprika
2t garlic powder
2t kosher salt
1t ground black pepper
1t onion powder
1/2t cayenne pepper
1 1/4t dried oregano

The sausage that I bought was Aidells All Natural Cajun Style Andouille Pork Sausage which I have found to be very clean ingredients.
Ingredients: pork, water, garlic, white pepper, red pepper, black pepper, sugar, paprika, celery powder and dehydrated onion.

Shrimp "Boil" Foil Packets
 
Author:
Ingredients
  • 1 lb large shrimp, peeled and deveined
  • 2 andouille sausage links, thinly sliced
  • 2 ears corn, each cut into 4 pieces
  • 4 medium red potatoes, cut into even bit size pieces
  • 2 T allowed oil
  • Cajun seasoning
Instructions
  1. Preheat oven to 425.
  2. Cut four sheets of foil, about 14-inches long. Divide shrimp, sausage, corn and potatoes in equal portions on two sheets of foil in a single layer.
  3. Pour 1 T of allowed oil over each of the packet contents and sprinkle cajun seasoning.
  4. Cover with other two sheets of foil and fold all sides to seal the packets closed.
  5. Place foil packets in oven and cook for 25-30 minutes.
  6. Serve immediately.
Notes
Nutrition information is not provided due alterations that can be made to accommodate food sensitivities.


Alternatives:
There are always substitutions that you can make in order to still enjoy the foods that you love! Here are a few substitutions that you can make in this recipe.

Oil – choose a mild oil that you can tolerate that doesn’t contribute a strong flavor.
Examples: olive oil, unflavored coconut oil, sunflower oil, rice bran oil

Seasonings – If you cannot tolerate seasonings in the cajun mix or do not have it salt and pepper always work!


Our cajun seasoning would be great on this One Dish Wonder chicken dinner!


Leave a comment below, we would love to know what you think!

Enjoy!

One Dish Wonder

One Dish Wonder: Dinner Made Easy

One Dish WonderWho doesn’t love an easy meal with minimal clean up?! I love this one dish wonder because it is infinitely modifiable for all food sensitivities. Because it is just the two of us, I prefer to make a large pan, usually 9×13, so that I have plenty for lunch the next day. I like to cook in bulk for a lot of my recipes because it is not always easy/convenient to make your meals everyday.

This recipe is great because it can be changed in so many ways. Here are some examples of what you could use to change it up.
Starchy vegetable: white potato, sweet potato, winter squash
Non-starchy Vegetable: green beans, broccoli, cauliflower, carrots, onion, yellow squash, zucchini, green peppers
Protein: chicken, pork, beef, turkey, lamb
Seasoning: salt, black pepper, garlic powder, onion powder, oregano, basil, parsley, cayenne pepper, cumin, red pepper flakes, paprika, leeks

Pick any combination and you can have unlimited meals!


Here are some ideas for spice mixes that you can use to personalize your one dish wonder.

Mexican Blend                                                 Ranch Seasoning
1T cumin                                                                  1tsp garlic powder
1-1/2t paprika                                                         2T parsley flakes
1t oregano                                                                1t onion flakes
2t garlic powder                                                     1t dill weed
1/2t onion powder                                                 1/2t black pepper
1-1/2t salt                                                                 1/2t basil
1-1/2t black pepper

Italian Blend                                                   Onion-Paprika Blend
1/2t garlic salt                                                       2t paprika
1-1/2t onion powder                                            1t onion powder
1-1/2t cane sugar/beet sugar                             1/2t salt
1T dried oregano                                                  1/4t cayenne pepper (optional)
1/2t black pepper
1/2t dried basil
1-1/2t dried parsley
1/8t celery salt
1/2t salt


One Dish Wonder: Dinner Made Easy
 
Easy dish that you can personalize to fit your family!
Author:
Recipe type: Dinner
Serves: 2 meals
Ingredients
  • 2 chicken breasts, cubed
  • 1 large sweet potato, cubed
  • 2C green beans
  • 1T oil
  • salt and pepper
Instructions
  1. Preheat oven to 350.
  2. Oil your baking pan.
  3. Place cubed chicken in the center of the baking pan and sweet potato and green beans on either side.
  4. Drizzle contents of pan with oil of your choice.
  5. Season with salt and pepper.
  6. Cover with foil and bake for 45 minutes.
Notes
Nutrition information is not provided due alterations that can be made to accommodate food sensitivities.


For family meals, you can use a 9×13 pan. Doubling the recipe should fill the pan but the recipe is flexible to your needs so make what you need for your family and season accordingly!

I like to make this recipe and divide it up for lunches to take to work so that I don’t make last minute bad decisions! When you’re following a specific diet, preparation is the key. Buying divided tupperware is a great way to do this. You can keep them in the refrigerator for meals in the coming days or put them in the freezer to have meals when you’re in a crunch. Buying glass tupperware and BPA-free plastic is important! I provided some great brands below that we like. Microwaving food in plastic can be detrimental to your health.


Our crusty dutch oven bread would be a great side to this meal!


Products:


What veggies did you use?

Enjoy!

5-Ingredient Cauliflower Soup

5-Ingredient Cauliflower Soup

5-Ingredient Cauliflower SoupGrowing up my dad would always make soup with the Thanksgiving turkey leftovers or after having a roast chicken for dinner. They were always so good! I was intimidated by making soups but one day I just decided to jump in and try it out. At first I made a green chicken chili and then I royally screwed up a black bean chili (who knew a whole can of ancho chiles could be SOO spicy… whoops!)

There has been a big kick with cauliflower lately. Roasted cauliflower. Cauliflower “mashed potatoes”. Cauliflower pizza crust. etc. etc. etc. Well you should try my cauliflower soup! I wish I could get Brandon (remember.. the veggie hater) to even give it a try but because he knows the ingredients he won’t even give it a shot.

I like to cut up all of the ingredients first so that I can throw them all in the pan at the right time. After the soup cooks for about 20-25 minutes you will need to blend the soup so your cuts don’t have to be beautiful but they should be relatively uniform so that they cook at the same pace. It is not good to have some super mushy and others raw… been there, done that!


Heat 1/2 T of the oil of your choice in a heavy pot/dutch oven. For this recipe I would use a mild flavored oil: olive oil, unflavored coconut oil, sunflower oil, rice bran oil, corn oil.

Brown garlic and onion in the pot. This process takes about 5-7 minutes. Be careful not to burn them. Browning the onion and garlic gives the soup an additional depth of flavor.

Once brown, add broth and chopped cauliflower. I prefer to use my own broth if I have some available but in a pinch I do keep some clean broths on hand.


Here a couple of brands that I like:
Swanson Chicken Cooking Stock: chicken stock, salt, carrots, cabbage, onions, celery, celery leaves, parsley
Progresso Vegetable Stock: water, celery, onions, carrots, cabbage, salt, parsley, leek, sugar, garlic, thyme, bay leaves

The Progresso brand is not approved for the initial phases of the LEAP diet but is a great clean broth if you are past phase 5 or not following the LEAP diet!


After the soup contents are soft add everything to a blender and puree until creamy. I had to do this in batches because my blender is not big enough to hold all of the soup. If you have an immersion blender, this would be the perfect time to use it. When everything is blended pour back into the pot and heat back up to serve!

I enjoy croutons with my puree soups so I made some homemade croutons with crusty dutch oven bread. The soup is also great with cut up scallions.


5-Ingredient Cauliflower Soup
 
Easy 5 Ingredient Cauliflower Soup that the pickiest of eaters will enjoy!
Author:
Serves: 4
Ingredients
  • ½ T oil
  • 2 garlic cloves, minced
  • 1 medium onion, chopped
  • 1 head cauliflower, chopped
  • 32 oz clean broth or homemade broth - chicken or vegetable
  • 1 tsp salt
Instructions
  1. In dutch oven, heat oil over medium heat. Add onion and garlic. Cook until slightly browned, about 5-7 minutes.
  2. Add broth and cut up cauliflower. Bring to a boil and cover. Simmer for 20-25 minutes until cauliflower is softened.
  3. In batches, pour contents of pot in blender. Blend until smooth. Continue until whole pot is smooth.
  4. Pour each batch back into dutch oven. Add salt and stir.
  5. Heat soup and serve with sliced green onions or homemade croutons.
Notes
Nutrition information is not provided due alterations that can be made to accommodate food sensitivities.


Products:


Here are other great recipes to make with these products: Crusty Dutch Oven Bread and Zucchini Pizza Bites


What’s your favorite homemade soup?

Enjoy!

Poached Egg and Grits

Poached Egg and Grits

Poached Egg and GritsFor me, breakfast is the hardest meal of the day. I struggle trying to find something that will keep me full until Lunch but that is easy/quick. So every morning I wake up and eat the same thing because it fits those criteria. Are any of you like this too?

This morning I had some extra time and decided to go back to one of my old staples – Poached Egg and Grits. After taking my food sensitivity test I discovered that I was sensitive to eggs. I cut them out of my diet for 6+ months and now I can tolerate them in small doses. Eggs in baked goods are easy for me to tolerate but if I’m careful for the rest of the day I can eat a whole egg.

My mom gave me a sign several years ago that adequately sums up my love for eggs and grits.

Man cannot live on eggs alone, have some grits!

Even though I don’t eat eggs every day now, this sign still sits in my kitchen to remind me of my favorite breakfast. I hope you give it a try!

Poached Egg and Grits
 
Author:
Serves: 1 serving
Ingredients
  • 1 egg
  • 2 T instant grits
  • ½ C water
  • salt and pepper
Instructions
  1. Fill small saucepan with water. Bring to a boil
  2. With a spoon, swirl water.
  3. Crack egg into water, turn stove down to simmer and cook for 2-4 minutes.
  4. While cooking, measure grits and water into microwave bowl.
  5. Microwave for 2-3 minutes, stirring periodically.
  6. Place egg on top of grits, season with salt and pepper.
Notes
Nutrition information is not provided due alterations that can be made to accommodate food sensitivities.


Alternatives:
If you have a corn allergy/sensitivity you can always eat a poached egg on a slice of crusty dutch oven bread or an avocado.


Products we use:


What’s your favorite breakfast?

Enjoy!

Thick Crust Pizza

Homemade Thick Pizza Crust

Thick Crust PizzaWho doesn’t love pizza? Brandon and I like to keep frozen pizza crusts in the freezer for those days when we just don’t feel like cooking! When I was going through my elimination diet one of the foods I had to trial was wheat. Through this I discovered that I can tolerate wheat which was such a relief!

There is such a stigma against wheat/gluten these days and a lack of understanding of why it is necessary for some people to cut out. What most people don’t know is that by cutting out gluten for a long period of time when it is not necessary your body starts to have a difficult time breaking it down when you add it back in. If you can tolerate gluten why wouldn’t you want to take advantage of that?

This recipe makes 2 thick crust 12-inch pizzas. Of course your could always divide it into 3 thin crust or even 4 individual pizzas if you and your family like different toppings.

The easiest way to make pizza dough is of course in a stand mixer with a hook attachment but you could always make it the old fashioned way (with your hands).

Homemade Thick Crust Pizza
 
Author:
Serves: 2 pizzas
Ingredients
  • 4C all-purpose flour
  • 1T + 1t active dry yeast
  • 1T + 1t sugar
  • 2t salt
  • 1T + 1t oil
  • 12oz warm water
  • 1t oil
Instructions
To make in stand mixer:
  1. Place flour in mixer bowl and create a well.
  2. Fill well with yeast, sugar, salt, 1T + 1t oil, and water.
  3. Attach dough hook to mixer and turn mixer on low until ingredients are combined (about 3 minutes)
  4. Turn mixer on medium speed and knead for 5-10 minutes until ball forms, push flour down as needed.
To make by hand:
  1. Place flour into large bowl and create a well.
  2. Fill well with yeast, sugar, salt, 1T + 1t oil, and water.
  3. Stir with spoon until combined (you may need to use your hands).
  4. Turn out onto floured surface and knead for 5-10 minutes by hand until ball forms.
Once you have the dough ball:
  1. Coat dough ball with 1t oil and cover with clean, dry towel.
  2. Place in warm place away from drafts until dough doubles in size, about 1 hour.
  3. Turn dough out on floured surface and punch down to remove excess air.
  4. Divide dough into 2 pieces.
  5. Roll out each piece into 12in pizza.
To make right away:
  1. Top with pizza sauce and your favorite toppings!
  2. Bake at 400 for about 12-15 minutes or until edges are brown and bottom is fully cooked.
To save for later:
  1. Pre-bake crust on pizza pan for about 5 minutes at 500 degrees until slightly brown and bottom is fully cooked.
Notes
Nutrition information is not provided due alterations that can be made to accommodate food sensitivities.


Alternatives:
There are always substitutions that you can make in order to still enjoy the foods that you love! Here are a few substitutions that you can make in this recipe.

Sugar – I didn’t specify the type of sugar because you can use cane sugar or beet sugar.
Oil – choose a mild oil that you can tolerate that doesn’t contribute a strong flavor to the pizza crust.
Examples: olive oil, refined coconut oil, sunflower oil, rice bran oil


Thick Crust Pizza 1


Give it a shot and make your own pizza crust! Not only is it better than ordering out but it has minimal ingredients and no preservatives 🙂


Products we use:

Here’s another great recipes to make with your stand mixer and smart oven: Oatmeal Breakfast Cookies


We make pretty traditional pizza. What are your favorite toppings?

Enjoy!