Roasted Almond Chocolate Ice Cream

Roasted Almond Chocolate Ice Cream

Roasted Almond Chocolate Ice CreamHappy Ice Cream Day!

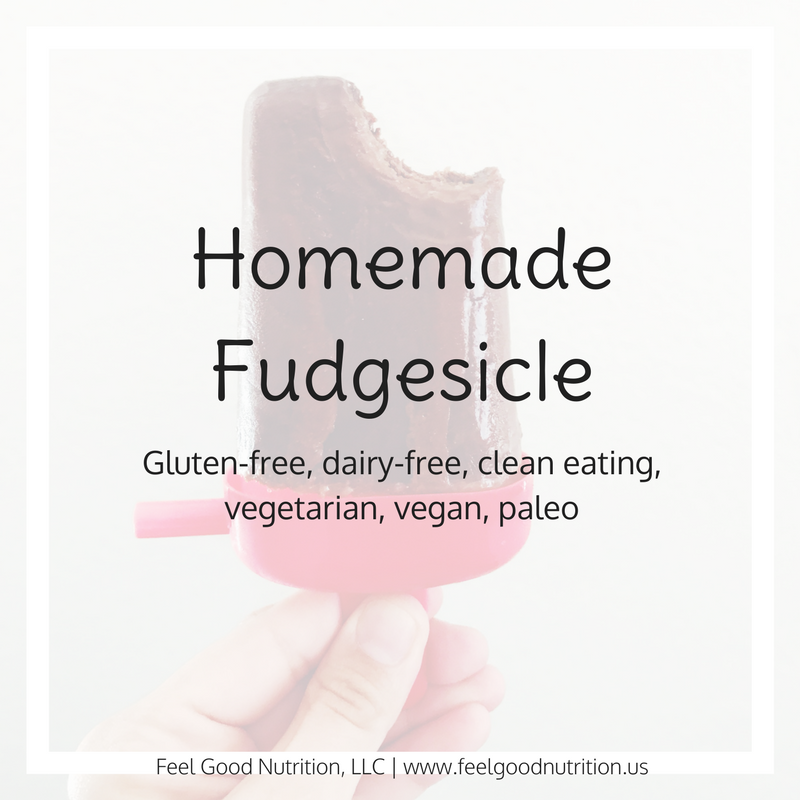
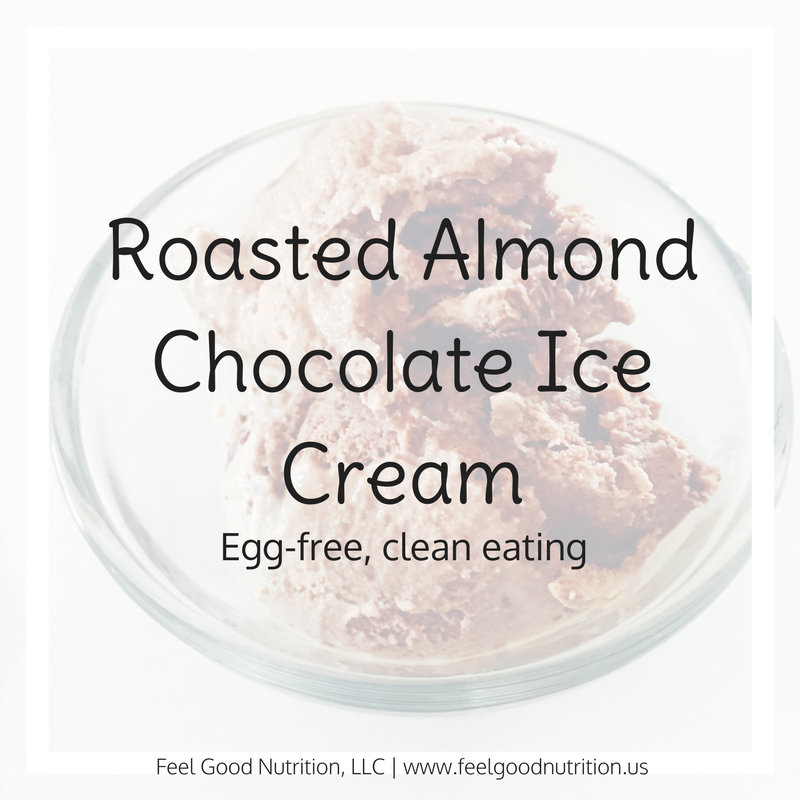
I realize my last recipe post was about fudgesicles but I can’t miss an opportunity to share my Roasted Almond Chocolate Ice Cream recipe ? .

Brandon and I have an ongoing joke that we make the best ice cream. Okay, so we aren’t actually joking when we say this. We really do make the best ice cream.


Homemade ice cream trumps store bought ice cream any day.

Not that ice cream is something we should be eating all the time but the more affordable brands are full of unnecessary ingredients.

Blue Bunny label

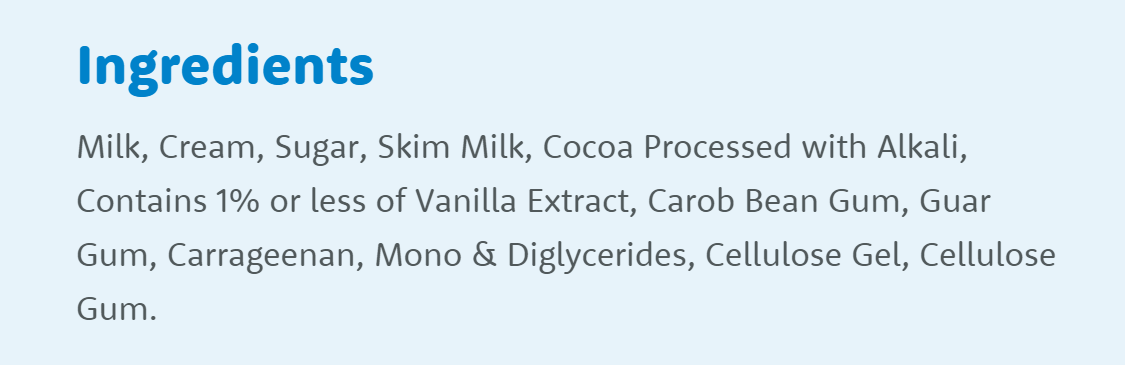
Exhibit A. Blue Bunny Chocolate Ice Cream Label


There is definitely a good reason to look at ingredient labels and spend a little more money for a higher quality product.

Haagen Dazs labelExhibit B. Haagen Dazs Chocolate Ice Cream Label


Did you know that carrageenan is a thickener derived from seaweed? Sounds harmless, right? Well, some animal studies have linked exposure to carrageenan to stomach ulcers and GI cancer. Other peer reviewed studies show that it causes inflammation, which is the root cause of many serious diseases including Alzheimer’s, Parkinson’s disease, cancer and inflammatory bowel disease.


So, if you want to drop $5 on a pint of ice cream feel free to do so, otherwise make your own and save a bundle ?


Roasted Almond Chocolate Ice Cream
 
Author:
Recipe type: Dessert
Ingredients
  • 2 C milk
  • 2 C heavy cream
  • ¾ C cane sugar
  • 2 tsp vanilla extract
  • ½ C cocoa powder
  • ½ C roasted almonds, chopped
Instructions
  1. Make sure ice cream bowl is in the freezer at least 24 hours before making ice cream.
  2. Pour milk, cream, sugar, vanilla and cocoa powder in a bowl and whisk until well combined.
  3. Set up ice cream maker and pull ice cream bowl out of the freezer. Pour ice cream mixture into bowl and turn oil.
  4. Let the machine run for about 15 minutes until soft serve consistency.
  5. Add chopped almonds and run for another 2-3 minutes.
  6. Transfer ice cream to a storage container and freeze until solid. Enjoy!
Notes
Nutrition information is not provided due alterations that can be made to accommodate food sensitivities.


Alternatives:
Sugar – cane sugar, beet sugar, blonde coconut sugar, brown coconut sugar would be great with chocolate ice cream!
Milk/Cream – full fat coconut milk
Cocoa – carob powder – or leave it out for vanilla ice cream!


Products we use:

Here is a great dairy-free recipe to make with this product: Honeydew sorbet


What’s your favorite ice cream flavor?

Enjoy!

Homemade fudgesicles

Dairy Free Fudgesicles – customize your own!

Homemade fudgesicles

Now that its summer we all want ice cream, right?

I always thought I hated chocolate ice cream but one thing I love is fudgesicles in the summer time! Who am I kidding, how could I hate chocolate ice cream?

Brandon and I keep hearing the ice cream truck pass by our house but I swear it makes sure that we are not outside because we are usually outside most days of the week and he never drives by when we want him too!

This weekend I got creative and tailored a standard fudgesicle recipe to my food sensitivity results and then I got to thinking. How can I make this even more customize-able!? I want everyone to be able to eat fudgesicles if their heart desires.

what your heart desires

And fudgesicles make me happy.


But I guess, I do like other desserts too – like this sorbet 🙂

Dairy Free Fudgesicles
 
These fudgesicles are super chocolaty and perfect for a hot summer day!
Author:
Recipe type: Dessert
Ingredients
  • ½ C cocoa powder or carob powder
  • ¾ C allowed granulated sweetener
  • 2 Tbsp allowed liquid sweetener
  • 1 tsp flavor extract
  • 2 C allowed milk
Instructions
  1. In a pot, whisk together the granulated sugar and cocoa or carob powder.
  2. Add the liquid sweetener and flavor of your choice.
  3. Turn the stove on medium heat and pour in your milk.
  4. Whisk until chocolate and sugar are dissolved. The mixture does not have to boil but the heat helps it dissolve better.
  5. Pour into popsicle molds.
  6. Place in freezer until solid.
  7. Enjoy!
Notes
Nutrition information is not provided due alterations that can be made to accommodate food sensitivities.


Alternatives:
Milk: whole fat coconut milk or 2% or whole cow’s milk – you need some fat!
Granulated sweetener: cane sugar, blonde coconut sugar, beet sugar
Liquid sweetener: corn syrup, brown rice syrup, honey, maple syrup, cassava syrup, coconut nectar, homemade simple syrup – I use this recipe to make my simple syrup
Chocolate: you can also use carob powder for a caffeine free version!
Flavor Extract: vanilla, almond, mint would all be great flavors – I would use ½ tsp if you use mint because it is strong.


Products:


Enjoy!

fudgesicle

Oatmeal Breakfast Cookies

Oatmeal Breakfast Cookies

Oatmeal Breakfast CookiesI’ve always struggled with finding a quick and easy breakfast that fits with my food sensitivities. Then I came across these cookies, made some modifications to meet my food sensitivities and BAM – my oatmeal breakfast cookies were born ?.

I started making these cookies a couple of years ago and got my whole family hooked – I even gave them out as Christmas presents! Oh the life of a poor post grad… Those were the days when it was acceptable to give cookies for family Christmas presents.

These past couple of weeks on the new job have been great…and busy! I love my cancer patients and survivors about a healthy diet but I am so glad to keep my private practice and continue my work with food sensitivity clients.

With my busy schedule of work during the day and food sensitivity clients in the evenings and weekends I am always looking for quick, healthy meals. I had forgotten about these cookies until recently and I’m excited to bring them back and share with all of you.


Oatmeal Breakfast Cookies
 
These cookies are great frozen!
Author:
Recipe type: Breakfast
Ingredients
  • 1.5 C whole rolled oats
  • 1 C unsulfured, unsweetened coconut flakes
  • 1 Tbsp chia seeds (optional)
  • ½ tsp salt
  • ½ tsp cinnamon (optional)
  • ¾ C coarsely chopped allowed nuts OR ½ C nuts + ¼ C LEAP friendly chocolate chips
  • ½ C allowed dried fruit
  • 1 C unsweetened applesauce OR 3 ripe mashed bananas
  • ¼ C coconut oil or other mild allowed oil
  • 1 Tbsp allowed liquid sweetener
  • 1 tsp pure vanilla extract
Instructions
  1. Preheat oven to 350 degrees.
  2. Place parchment paper on large cookie sheet.
  3. Combine all the dry ingredients in a large bowl then add all the wet ingredients. Mix well until combined.
  4. Form cookies – about 2 tablespoons each – onto the cookie sheet.
  5. You can place them all on one pan because they do not spread so keep them close together.
  6. Bake about 25 minutes until golden brown then cool completely on the pan.
Notes
Nutrition information is not provided due alterations that can be made to accommodate food sensitivities.


Alternatives:
The chia seeds and cinnamon are optional. Leave them out if you have not added this into your diet or do not know if it is a potential trigger food.

Allowed nuts – chopped pecans, chopped walnuts, or sliced almonds might be good options
Allowed dried fruit – banana chips, chopped unsulfured apricot, dried cranberries, dried blueberries
Allowed liquid sweetener – maple syrup, honey, brown rice syrup, corn syrup, tapioca syrup


Products:


What do you eat for breakfast?

Enjoy!

Apricot Cherry Vegan Protein Bars

Vegan Protein Bars – Cherry and Apricot

Apricot Cherry Vegan Protein BarsAfter my month long hiatus I’m coming at you with some pretty amazing vegan protein bars. This month has been busy and I have not had much time to try new recipes or even cook much!
 

So many things that happened this month:

  1. WE’RE MOVING! I accepted a great job in Phoenix, AZ as an Integrative Dietitian. I will be working at an Integrative Oncology Center associated with MD Anderson. *Pinch me!*
  2. I became a consultant for Beautycounter. This company blew me away when I learned about them! They are growing fast and making a huge splash in the beauty industry. They have high standards for their products. One thing I loved was that they placed 1500 chemicals on a Never List. This is a list of chemicals they will never use because of their harmful or potentially harmful effects on the body. (More on this later I’m sure!)
  3. I recently came back from a trip to Punta Cana, Dominican Republic. It was a blast but talk about a challenge for those us of with IBS! I was sick with stomach pains for a good part of the trip but I tried not to let that interfere with the fun. My food sensitivity test results allowed me to make smart choices. It was difficult when I didn’t know the ingredients in meals and sometimes it was hard to avoid. Nevertheless, I have a new love for cassava/yucca because that’s what I ate most of the time. I’m excited to experiment with it now that I’m home and make some awesome recipes!
 
Whew! That was a lot but now I’m back and getting back into the swing of things ?
 
Okay so back to these amazing vegan protein bars that I touched on early. I wish I could claim this recipe but I have adapted it from Lindsay Cotter at her blog: Cotter Crunch. She specializes in healthy, gluten free cooking and has some pretty amazing recipes!
 
I try to post recipes that contain ingredients found on our food sensitivity blood test – there are 120 different foods so we try to stick with that. This recipes veers off a little. The one extra ingredient that is not tested is chia seeds. They add 6 grams of protein to the batch and some healthy fats but if you can’t have them then take them out! I will list them as optional in the recipe below.
If the recipe doesn’t 100% work for your food sensitivities make sure to scroll all the way down. I try to make my recipes very general so that they work for everyone. There are so many substitutions that can be made for this recipe so that it works for you!

Cherry Apricot Vegan Protein Bars
 
Author:
Ingredients
  • 1-15oz can whole chickpeas (rinsed and dried)
  • ½ C rolled oats
  • ⅓ C dried apricots (sulfite free if necessary)
  • ⅓ C dried cherries
  • 2 Tbsp chia seeds (optional)
  • 4 Tbsp allowed liquid sweetener - see substitutions for ideas
  • 1 tsp pure vanilla extract
  • ⅔ C allowed milk - see substitutions for ideas
  • dash of cinnamon (optional)
  • dash of salt
Instructions
  1. Preheat oven to 350F.
  2. In a food processor (or blender) combine oats, chia seeds and apricots. Blend until chopped. Empty contents into mixing bowl.
  3. In same food processor (or blender) add chickpeas. Blend until finely chopped (not pureed).
  4. Add chickpea meal to same mixing bowl.
  5. Mix in allowed sweetener, allowed milk, cinnamon, vanilla, salt, dried cherries. Batter will be very wet.
  6. Pour batter into greased 9x9 pan and spread out to even mixture.
  7. Bake at 350F for 30-40 minutes or until edges are golden brown and center is no longer soft.
Notes
Nutrition information is not provided due alterations that can be made to accommodate food sensitivities.

Vegan Protein Bar

Alternatives:
Oats – you can substitute with any rolled grain like quinoa flakes, barley flakes, rye flakes, spelt flakes, wheat flakes.
Dried fruit – this can also be other dried fruit. Dried apples, dried cranberries, dried blueberries, etc
Liquid sweetener – the recipe originally calls for 100% maple syrup or honey but if you cannot have either of these you can also use rice bran syrup, coconut nectar, corn syrup, cassava syrup
Allowed milk – this can be cow’s milk, any nut milk, oat milk, soy milk, etc


Products:


What’s your favorite homemade bar?

Enjoy!

Zucchini Pizza Bites

6-Ingredient Zucchini Pizza Bites

Zucchini Pizza BitesHappy National Pizza Week!

Until now I didn’t know National Pizza Week existed but I can’t say I’m sad about it! This gave me an excuse to create a new healthy “pizza”-like recipe. So below I bring you ~ Zucchini Pizza Bites with Sauteed Onion Puree and Goat Cheese

I know you can’t wait for this recipe.
Keep reading or just scroll down to the recipe – I won’t be mad!

Throughout the years I have experimented with different carriers (crusts) for pizza and different sauces – some have been better than others. I’ve made my own pizza dough, eggplant pizza, zucchini pizza, cauliflower pizza, quinoa pizza bites, pesto pizza, bbq chicken pizza – ya dah ya dah ya dah. I love pizza because there are endless possibilities. No matter what your food restrictions are I’m confident that we can find a pizza that works for you!

carrier + delicious sauce + cheese = Pizza

My zucchini pizza bites are a take on the standard zucchini pizza but with my food-sensitivity-accommodating twist!

Here are some of the food sensitivities I avoid when attempting to make pizza:

  • Tomatoes – There are a lot of ‘no-mato’ sauces for people who are sensitive to nightshade vegetables. Different varieties are made with beets, carrots, red bell peppers, etc. I can’t say that I have ever had them but have been wanting to make beet ketchup soon! Stay tuned!
  • Garlic – To find recipes without garlic is nearly impossible most of the time. One trick that I use is to search “Low-FODMAP – insert food here” – i.e Low FODMAP pizza sauce, etc. This is a great place to start and then you can narrow down after that.
  • Olives – This eliminates olive oil. Depending on their use, it is pretty easy to replace the requested oil with any allowed oil. In my recipes I try to list the oil as “allowed oil” unless a specific oil is needed for flavor or texture – like sesame oil, which has a very strong flavor.

Anywho…

I made a New Years Resolution to myself to pay close attention to my food sensitivities because my symptoms of IBS are getting worse again – which happens when you get careless – oops! The worst thing about it is that I have total control over it but for several months had chosen to ignore it – I blame the holidays. Being able to control my symptoms and feeling good everyday makes it all worth it!


Here’s to the New Year, New Year’s Resolutions and Pizza 🙂

6-Ingredient Zucchini Pizza Bites
 
Enjoy this 6-ingredient pizza bite recipe! Great for an appetizer at a family get together or just make a full plate for yourself!
Author:
Ingredients
  • 1 Tbsp allowed oil
  • 1 Zucchini - cut diagonally into ¼-inch slices
  • 1 Yellow onion - sliced
  • ¼ Cup chicken/vegetable broth
  • 1oz Goat cheese
  • Fresh oregano - chopped
Instructions
  1. Heat allowed oil in pan. Sautee onions until soft and golden brown - about 10-12 minutes
  2. Place sauteed onions and ¼ cup broth into blender and blend until smooth. I used my immersion blender which worked great!
  3. Place zucchini slices in the pan that was used to sautee onions. Cook each side for 2-3 minutes. The zucchini should be lightly browned on each side but not soft.
  4. To assemble pizza put a dollop of onion puree on top of the cooked zucchini (You can put as much or as little as you would like depending on your taste!), place crumbled goat cheese on top of onion puree and garnish with chopped oregano.
Notes
Nutrition information is not provided due alterations that can be made to accommodate food sensitivities.


Alternatives:
Carrier – I bet this would taste AH-mazing on a wheat or gluten free traditional pizza crust, eggplant rounds, yellow squash slices, or cauliflower crust
Toppings – you can use any variety of cheese like gruyere. Pair it with sauteed mushrooms!


Products:

Here is another great recipe that you can make with an immersion blender: 5-Ingredient Cauliflower Soup


What’s your favorite kind of pizza?

Enjoy!

Crockpot Quinoa Enchilada

Crockpot Quinoa Enchilada

Crockpot Quinoa EnchiladaA couple of months ago I started part time consulting at a local migrant Head Start program. As their nutritionist, I plot all of the kids on a growth chart to identify where they fall in terms of weight for length (height). For the kids that plotted above the 85th percentile I was able to sit down one on one with the parents of the overweight/obese kids and discuss the importance of exercise and a healthy diet. Majority of these kids are getting multiple sweets per day and limited vegetables. Just a few weeks ago I was able to host a meeting with all of the parents to share my role at the school and answer any questions.

During the meeting we were raffling off a crockpot so I made a healthy twist on the classic mexican dish – enchiladas. The director of the school told me that the kids are given quinoa and really seem to like it. Quinoa cooks very similar to rice but if a complete protein – meaning that it can replace meat in a meal.

Try this recipe with: crusty dutch oven bread!

Crockpot Quinoa Enchilada
 
Author:
Cuisine: Mexican
Ingredients
Crockpot Enchilada
  • 1 cup quinoa, rinsed
  • 1 - 15oz can pinto beans, drained and rinsed
  • 1 - 15oz can corn, drained
  • 2 - 15oz cans diced tomatoes
  • 2 cups enchilada sauce
Enchilada Sauce
  • 3 cups broth
  • ¼ cup tomato paste
  • ¼ cup all purpose flour
  • 2 Tbsp allowed oil
  • 2 tsp cumin
  • ¼ tsp garlic powder
  • ¼ tsp onion powder
  • ¼ tsp paprika
  • Optional: start with ¼ tsp cayenne pepper for spice. Add more to taste.
Instructions
Enchilada Sauce
  1. In a small bowl, mix flour, cumin, garlic powder, onion powder and paprika.
  2. In medium saucepan, heat oil over medium heat.
  3. Add tomato paste and bowl of spice mix.
  4. Cook 1 minute, whisking continuously.
  5. Whisk in broth, increase heat, and bring to a light boil.
  6. Reduce to simmer. Cook about 8 minutes until slightly thickened, whisking occasionally.
  7. Add salt/pepper to taste.
Crockpot Enchilada
  1. Place pinto beans, corn, tomatoes and quinoa in a crockpot. Stir everything together and top with enchilada sauce.
  2. Cover and cook on high for 4-5 hours or on low for 8 hours.
Notes
Nutrition information is not provided due alterations that can be made to accommodate food sensitivities.

Quinoa Enchilada


Products:

Here are other great recipes to make in your crockpot: Crockpot Whole Chicken


Would love to know what you think and if you made any alterations!

Enjoy!

Thick Crust Pizza

Homemade Thick Pizza Crust

Thick Crust PizzaWho doesn’t love pizza? Brandon and I like to keep frozen pizza crusts in the freezer for those days when we just don’t feel like cooking! When I was going through my elimination diet one of the foods I had to trial was wheat. Through this I discovered that I can tolerate wheat which was such a relief!

There is such a stigma against wheat/gluten these days and a lack of understanding of why it is necessary for some people to cut out. What most people don’t know is that by cutting out gluten for a long period of time when it is not necessary your body starts to have a difficult time breaking it down when you add it back in. If you can tolerate gluten why wouldn’t you want to take advantage of that?

This recipe makes 2 thick crust 12-inch pizzas. Of course your could always divide it into 3 thin crust or even 4 individual pizzas if you and your family like different toppings.

The easiest way to make pizza dough is of course in a stand mixer with a hook attachment but you could always make it the old fashioned way (with your hands).

Homemade Thick Crust Pizza
 
Author:
Serves: 2 pizzas
Ingredients
  • 4C all-purpose flour
  • 1T + 1t active dry yeast
  • 1T + 1t sugar
  • 2t salt
  • 1T + 1t oil
  • 12oz warm water
  • 1t oil
Instructions
To make in stand mixer:
  1. Place flour in mixer bowl and create a well.
  2. Fill well with yeast, sugar, salt, 1T + 1t oil, and water.
  3. Attach dough hook to mixer and turn mixer on low until ingredients are combined (about 3 minutes)
  4. Turn mixer on medium speed and knead for 5-10 minutes until ball forms, push flour down as needed.
To make by hand:
  1. Place flour into large bowl and create a well.
  2. Fill well with yeast, sugar, salt, 1T + 1t oil, and water.
  3. Stir with spoon until combined (you may need to use your hands).
  4. Turn out onto floured surface and knead for 5-10 minutes by hand until ball forms.
Once you have the dough ball:
  1. Coat dough ball with 1t oil and cover with clean, dry towel.
  2. Place in warm place away from drafts until dough doubles in size, about 1 hour.
  3. Turn dough out on floured surface and punch down to remove excess air.
  4. Divide dough into 2 pieces.
  5. Roll out each piece into 12in pizza.
To make right away:
  1. Top with pizza sauce and your favorite toppings!
  2. Bake at 400 for about 12-15 minutes or until edges are brown and bottom is fully cooked.
To save for later:
  1. Pre-bake crust on pizza pan for about 5 minutes at 500 degrees until slightly brown and bottom is fully cooked.
Notes
Nutrition information is not provided due alterations that can be made to accommodate food sensitivities.


Alternatives:
There are always substitutions that you can make in order to still enjoy the foods that you love! Here are a few substitutions that you can make in this recipe.

Sugar – I didn’t specify the type of sugar because you can use cane sugar or beet sugar.
Oil – choose a mild oil that you can tolerate that doesn’t contribute a strong flavor to the pizza crust.
Examples: olive oil, refined coconut oil, sunflower oil, rice bran oil


Thick Crust Pizza 1


Give it a shot and make your own pizza crust! Not only is it better than ordering out but it has minimal ingredients and no preservatives 🙂


Products we use:

Here’s another great recipes to make with your stand mixer and smart oven: Oatmeal Breakfast Cookies


We make pretty traditional pizza. What are your favorite toppings?

Enjoy!